52 Users Online
Revision: 20150325_045302 | All Revisions
The Swiss Arms Programmable MOSFET Burst Unit is an electronic device that attaches between your airsoft gun and your airsoft battery. It provides a number of features, which we will explain in this review article.
Feature #1: The primary reason for airsoft programmable burst control unit is to provide a bit of realism to your airsoft gun. That is driven by many real steel rifles that can fire in burst mode. For example, the M16 fires in three-round burst. By using a programmable burst control unit, your airsoft rifle can fire in burst mode as well.
Feature #2: The basic airsoft electronic gun (AEG) is quite simple. Your trigger closes contact from the battery to the motor. This simple contact does not provide consistent voltage and current draw. The MOSFET portion of the electronic solves that problem by providing consistent voltage and current to the motor.
Feature #3: Battery cut-off to prevent over-discharge of sensitive batteries. This feature is primarily targets LiPo and LiFe batteries, where over-discharge can create a fire hazard and damage the battery.
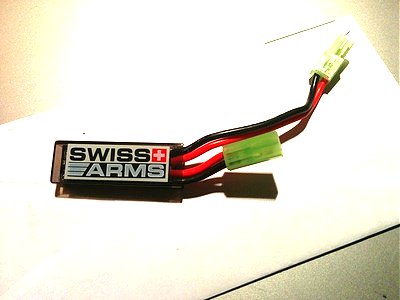
Now that we all know what a burst unit does, let's look at the Swiss Arms Programmable MOSFET Burst Unit. The burst unit, shown in the photo below, is a small circuit board encased in a hard transparent plastic. However, the transparency is rather useless it is covered by logo and other labeling. There are two mini Tamiya connectors. The female connector connects to the airsoft gun, while the mail connector connects to the airsoft battery.

This burst unit is probably one of the simplest burst unit on the market. There are only two adjustments you can make: 1) select the type of battery; 2) changes the burst rounds. Sadly, no instruction is included with this burst unit. So this web page will serve as the instruction as well.
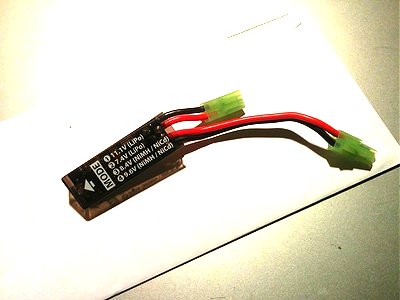
This burst unit works with four different battery types (see photo below): 1) 11.1v (LiPo); 2) 7.4v (LiPo); 3) 8.4v (NiMH/NiCd); 4) 9.6v (NiMH;NiCd). The fact that you have to manually change the battery type and voltage, makes it difficult to use when you carry different batteries on the field.

There is a tiny little hole on the bottom of the enclosure. To change the battery type, you have to stick a little pin through the hole to press a button on the circuit board. That means you also have to carry a small tool with you.
You can see the current battery type setting by pushing and releasing the circuit button with a pin quickly. A LED will blink. The number of times it blinks represents the battery type mode it is set to.