
50 Users Online
![]() Attach
|
Attach
|
![]() Edit
|
Edit
|
![]() Revisions
Revisions
![]() Related Content
Related Content
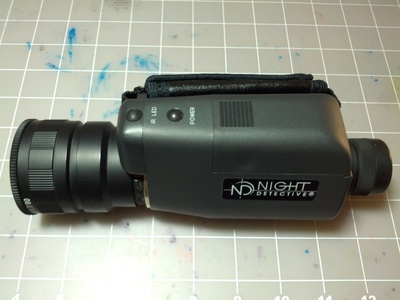
So I had a Night Detective Quest 5 (ND-Q5) Night Vision Monocular for a while. I used it to watch nocturnal animals and shoot photographs of them. Now that I had gotten into airsoft, I wanted to use this night vision monocular for airsoft night operations as well. This article documents my experimentation. The photo below is the Night Detective 5x night vision monocular.
Cross Reference
This article documents the usage of the Night Detective Quest 5 (ND-Q5) Night Vision Monocular on airsoft guns. It doesn't talk about the monocular itself. However, take a look at the "Night Detective Quest 5 (ND-Q5) Night Vision Monocular Review" article to learn more about the monocular.
The first idea I had was to use the night vision monocular for observation. It is useful in the dark to identify enemies on the airsoft field. It's very useful during an indoor light-out game, or a night MilSim operation on an outdoor field.
You can already use the monocular by itself. Just pull it out of your bag, your pants pocket, or where ever you carry it. But getting it out slows you down. So the idea is to attach it to your airsoft gun. Your airsoft gun is always in your hand. Having the monocular on the airsoft gun gives you quick and easy access to survey the field in the dark.
I preferred coming up with a way to attach the monocular to the Picatinny rail on the gun. But couldn't really find any parts that would help. So I settled with hockey tape (see photo below). Wrapping the hockey tape around the monocular and the M4 quad-rail supported its weight.
Update
I have now completed this project, including a good, clean method to attach the monoscope to the Picatinny rail like any other Pictainny accessory. Keep reading.
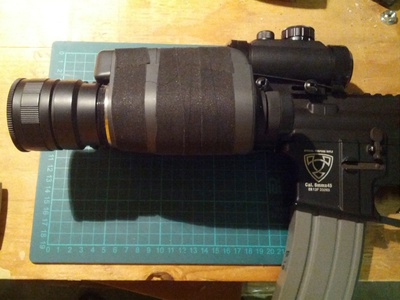
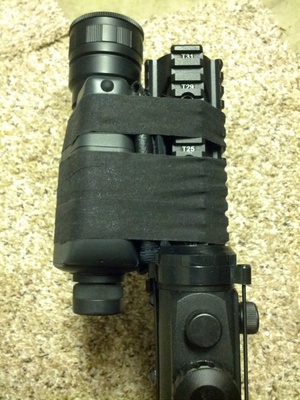
I was able to view the night vision scope by moving my paintball mask up to the eyepiece. The clear paintball pane provided just the right distance to get a clear view through the monoscope eye-piece. And it has just enough clearance to the right, which allow me to use my paintball facemask without the gun getting in the way. The photo below shows the monocular attached to my Shark Raptor airsoft rifle from the top.
Cross Reference
The Shark Raptor is a custom airsoft M4 pistol that I have built in the "Build a Science Fiction Airsoft Gun" article.
The photo below shows the entire Shark Raptor and the monocular. The monocular is quite heavy, so on a short gun like the Shark Raptor, it's a little off balance. But I had no problem holding it up and using it for battle.
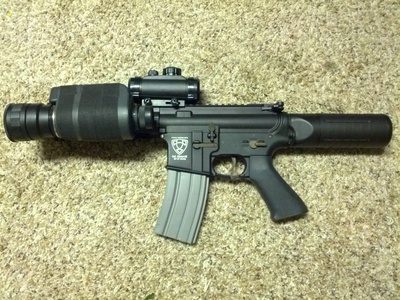
In practical use, I found the 5x magnification to be too much for an indoor CQB field. I was able to see things in the dark clearly. But the field-of-view (FOV) was too narrow for it to be much of use. It'd be more usable with less magnification or no magnification at all.
I had limited success with this monocular on an indoor CQB airsoft gun, so I decided to try turning my red dot scope into a night vision scope on my outdoor gun. My outdoor gun happens to be a JG M5-S6; surprise, surprise! Yes, the MP5-SD3 is longer than the Shark Raptor, so I use it for outdoor battles.
Cross Reference
You can take a look at how long the JG M5-S6 compares to the APS Mini Patriot M4, which is the exact same size as the Shark Raptor, in this "Size Comparison: APS ASR106 Patriot M4 vs. JG M5-S6 MP5" article.
The following photo shows my JG M5-S6 with the NcStar Tactical Red/Green Dot Sight with 30mm Cantilever Weaver Mount (DMRG130) and the Avengers Tactical 3X Magnifier already configured on the gun. The 1" riser and the 1/2" offset riser is normally not needed. But they are necessary in order for the monocular to work. It's difficult to see, but I have added the Aim Sports MP5/H and K Scope Mount to the MP5, so that this setup would work. (All these parts are reviewed elsewhere on this site as well.)
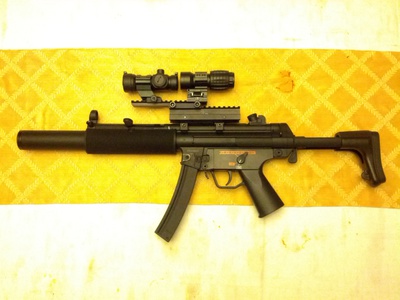
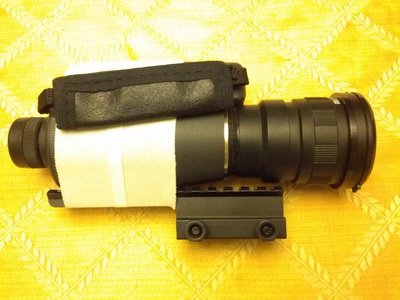
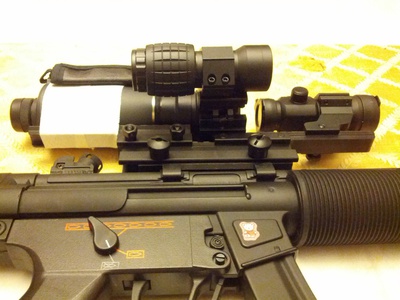
The idea is that the 5x monocular would replace the Avengers Tactical 3X Magnifier during night missions. The configuration could be changed quickly and easily. In order to accomplish these goals, I ordered an 1" offset riser, with quick release thumbscrews, for the monocular. I had a bunch of white sport tape lying around, so I taped the monocular to the offset Picatinny riser for prototyping (see photo below).
The photo below shows the MP5-SD3 with the night vision monocular as an optional attachment. From the picture, it's difficult to see how the monocular would attach.
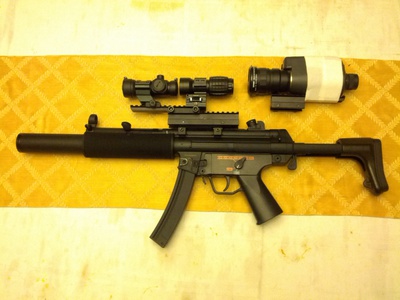
But have no fret, the night vision monocular is attachable with a comfortable clearing after the Avengers Tactical 3X Magnifier has been flipped to the side. The photo shows the monocular attached to the gun. The quick release thumbscrews makes it a quick and easy attachment. The 1" offset riser under the monocular and the 1/2" offset riser under the NcStar Tactical Red/Green Dot Sight with 30mm Cantilever Weaver Mount (DMRG130) line up the red/green dot perfectly in the center of the night vision monocular.
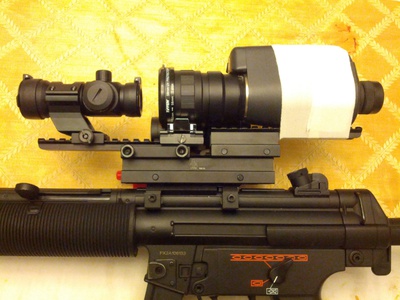
From the other side of the gun, you can see that the Avengers Tactical 3X Magnifier has been flipped to the side. Unless you have a way to protect the Avengers Tactical 3X Magnifier lens element from BB hits, you don't really want to keep it flipped to the side; it's better to remove the Avengers Tactical 3X Magnifier from the gun during night missions.
The photo below shows the night vision configuration of the entire gun. As you can see, it adds significant bulk to the gun. But it's worth it in a nighttime special operation.
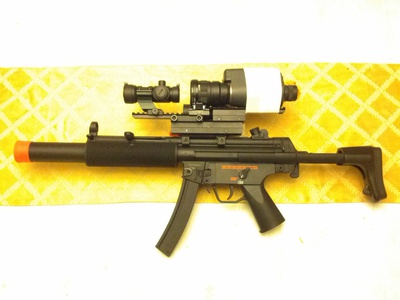
I have tried this configuration in the dark. The red/green dot is too bright. So you'll have to turn it off. Luckily the 5x provide a very limited field of view. Therefore, if you adjust the alignment so that the red/green dot is exactly in the center of the field-of-view (FOV), then you can just use the monocular and the red dot scope without turning on the red/green dot.
I have used this set-up successfully in outdoor operations. At this time, I have reverted all my MP5's to indoor CQB duty and am using a M4 and a VSS Vintorez for outdoor operations. The 5x night vision monocular is an important asset in these nighttime outdoor operations. So it's time to set it up so that I can be mounted using standard Picatinny methods.
First, it's time to get a Picatinny rail onto the monoscrope. The Picatinny rail is a very versatile military design. With it, the monoscope can be enhanced with IR torch, laser sight, and other standard Picatinny accessories. In addition, we will use this rail to mount it to the airsoft rifle.
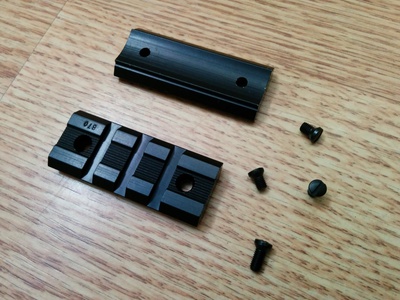
The monoscope has a rounded body. I couldn't find a Picatinny rail with a round bottom. Fortunately, I was able to find Weaver rails with a round bottom. These Weaver 48346 Aluminum Base Pair (see photo below) are available at my local Walmart store. You can also find them online at Amazon, marketed as "Remington 870 with drilled and tapped receiver" (see "Related Links" below).
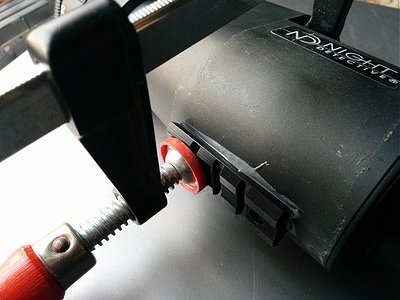
Normally, I use Loctite Stik 'n Seal outdoor adhesive to secure Picatinny rails on guns and power tools. But I have used it all up. I happen to have a brand new pack of J-B Weld on hand. The photo below shows the Weaver rail being glued to the bottom of the monocular, assisted by a C-clamp.
After the glue dried, I found the rail tightly secured to the monoscope. So that gave me the confidence to mount it to my airsoft M4 rifle. To do that, I used a special Airsoft3D Weaver Rail to Rail Adapter. This adapter allows you to fasten two Picatinny rails together. The photo below shows the night vision monoscope being secured to a Picatinny riser with the Airsoft3D Weaver Rail to Rail Adapter.
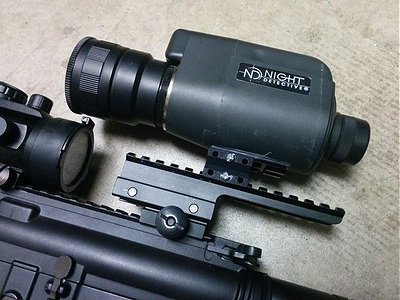
The full set-up is shown below. I used a 1/2" Picatinny riser, a 1" Picatinny offset riser to clear the 42mm NcStar Red Dot Scope. Yah... that's a large 1x scope.
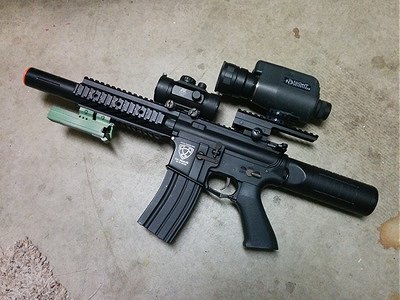
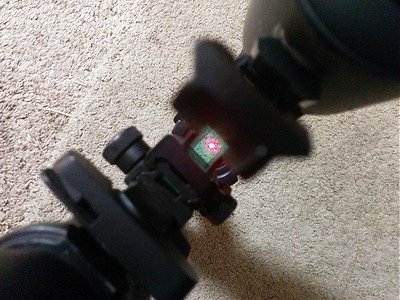
The 1" Picatinny riser provides a large see-through slot that actually centers on the red dot sight (see photo below). At night time, I use the night vision scope with a low-power laser sight. If lighting permits, I can co-witness with the red dot scope.
Cross Reference
In the "Emulating Infrared Laser Sight with Standard Red Laser Sight" article, I explain how I use a low-power laser to emulate an infrared laser sight for night operations.
The Night Detective Quest 5 (ND-Q5) Night Vision Monocular retails for about $180. That's not cheap. The possibility of BB damage to the front lens element is highly likely. Luckily, it's relatively easy to protect it.
Cross Reference
You can see shattered red dot sights in our "Protecting the Optical Sight on Airsoft Guns" article.
The Night Detective Quest 5 (ND-Q5) Night Vision Monocular has a 52mm front lens thread, which is standard in the photography community. You can get a 52mm UV filter to screw onto the front. I happen to have numerous 58mm UV protection filters, so I used an 52mm-58mm step-up ring to make the combination work (see photo below).
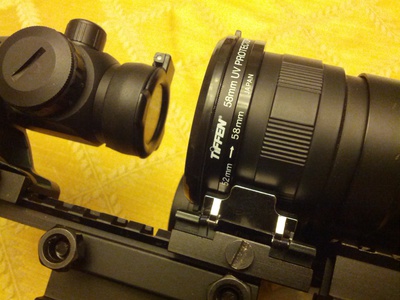
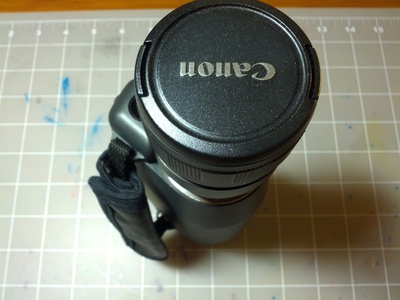
The night vision monocular is sensitive to light, so in strong sunlight, the image intensifier can be damaged. Therefore you should use a lens cap on the front of the UV filter when you are not using the monocular on a night mission. A simple camera lens cap will do. The photo below shows a Canon lens cap attached to the front of the monocular.
![]() Attach
|
Attach
|
![]() Edit
|
Edit
|
![]() Revisions
Revisions
![]() Related Content
Related Content